

Minecraft is a game that invites creativity. Players build, explore, and survive in blocky worlds. But the graphics are basic, especially compared to modern games. This is where shaders come in. Shaders are add-ons that change how Minecraft looks. They make the game brighter, add shadows, improve water, and even change the way light works. For many, shaders turn Minecraft from a simple game into a stunning experience. Learning how to install shaders Minecraft can feel confusing, especially for beginners. There are several steps, and mistakes are common. This guide will walk you through every part of the process, with clear advice and practical tips. Whether you want a realistic world or just a bit more color, you will soon know how to install shaders Minecraft safely and easily.
What Are Minecraft Shaders?
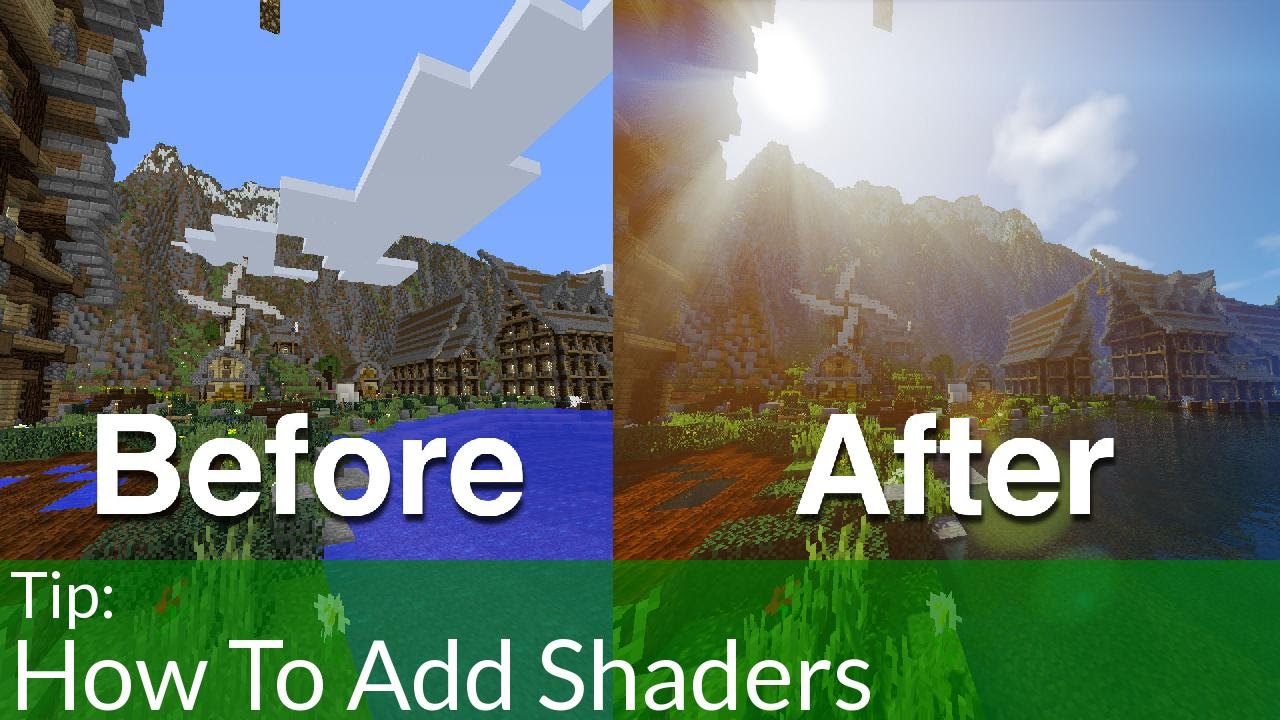
Shaders are software programs that change how graphics are drawn in games. In Minecraft, shaders can make the game look more beautiful. They add effects like glowing sunlight, moving shadows, and realistic water. Imagine trees that cast real shadows, sunsets that light up the sky, and water that reflects clouds. These effects make Minecraft feel alive.
Shaders work by replacing the way Minecraft handles light and color. Instead of flat colors and basic lighting, shaders use advanced effects. Some shaders focus on realism, while others make the game look cartoon-like or magical.
Most shaders are made by fans, not by Mojang (the company behind Minecraft). There are many shaders to choose from, each with its own style. Some are simple and run well on older computers. Others need powerful hardware, like a modern graphics card.
Why Install Shaders In Minecraft?
Minecraft is popular because it is simple and easy to play. But many players want more. Shaders offer:
- Better graphics: Shaders make Minecraft look more modern. You get shadows, reflections, and smooth lighting.
- Personalization: You can choose shaders that match your taste. Some are bright and colorful, others are dark and moody.
- Fun screenshots and videos: If you share your builds online, shaders make them stand out.
- Increased immersion: The world feels more real, making gameplay more exciting.
Installing shaders is not just about looks. It can also make you more creative. Seeing your builds in realistic light can inspire new ideas. Many players find they spend more time exploring and building once they install shaders.
What You Need Before Installing Shaders
Before you start, there are a few things you need. Missing one step can cause problems later.
- Minecraft Java Edition: Most shaders only work with Java Edition. If you have Minecraft Bedrock, shaders are harder to install and limited.
- A compatible version: Check if your Minecraft version matches the shader pack you want.
- OptiFine or a shader loader: OptiFine is the most popular tool for shaders. It adds new options to Minecraft and lets you use shaders. Other loaders, like Iris or Sodium, are also available.
- A good graphics card: Shaders use more computer power. If your computer is old, you might need to use lightweight shaders.
- Backup your game: Sometimes, installing shaders can cause errors. Always backup your worlds before you start.
Choosing The Right Shader Pack
There are hundreds of shader packs, but not all are equal. Picking the right one depends on your hardware and style.
| Shader Pack | Style | Performance | Best For |
|---|---|---|---|
| SEUS | Realistic | High | Modern PCs |
| Sildur’s Shaders | Vibrant | Medium | Most computers |
| BSL Shaders | Balanced | Medium | All users |
| KUDA Shaders | Natural | Medium | Builders |
| Chocapic13 | Customizable | Low to High | Low-end PCs |
SEUS (Sonic Ether’s Unbelievable Shaders) is famous for realism. It offers moving shadows, beautiful water, and true sunlight. But it needs a strong graphics card.
Sildur’s Shaders are colorful and flexible. They work on most computers and offer several versions, from light to extreme.
BSL Shaders are smooth and balanced. They offer good looks without slowing down your game too much.
KUDA Shaders give a natural look, with soft lighting and realistic colors. Builders who want their worlds to look lifelike often pick KUDA.
Chocapic13 has many versions. You can pick one for low-end computers or go for the extreme version if you have a powerful PC.
When choosing, check the shader’s website for screenshots and system requirements. If your computer is not very strong, pick a shader with “Lite” or “Low” in the name.
Step-by-step: How To Install Shaders Minecraft
Installing shaders is easy if you follow each step. Here is a clear guide for beginners.
Step 1: Install Optifine
OptiFine is a tool that lets you use shaders and improves performance.
- Go to the OptiFine website and download the version that matches your Minecraft version.
- Double-click the OptiFine file. It will open a small installer window.
- Click “Install.” OptiFine will create a new profile in your Minecraft launcher.
- Open the Minecraft launcher. Select the OptiFine profile and click “Play.”
If you use other mods, install OptiFine through Minecraft Forge. This lets OptiFine work with other mods.
Step 2: Download A Shader Pack
- Find a shader pack you like. Sildur’s, BSL, and SEUS are good for beginners.
- Download the shader pack as a ZIP file. Do not unzip it.
- Make sure the shader pack matches your Minecraft and OptiFine version.
Step 3: Move The Shader Pack To The Correct Folder
- Open Minecraft with OptiFine.
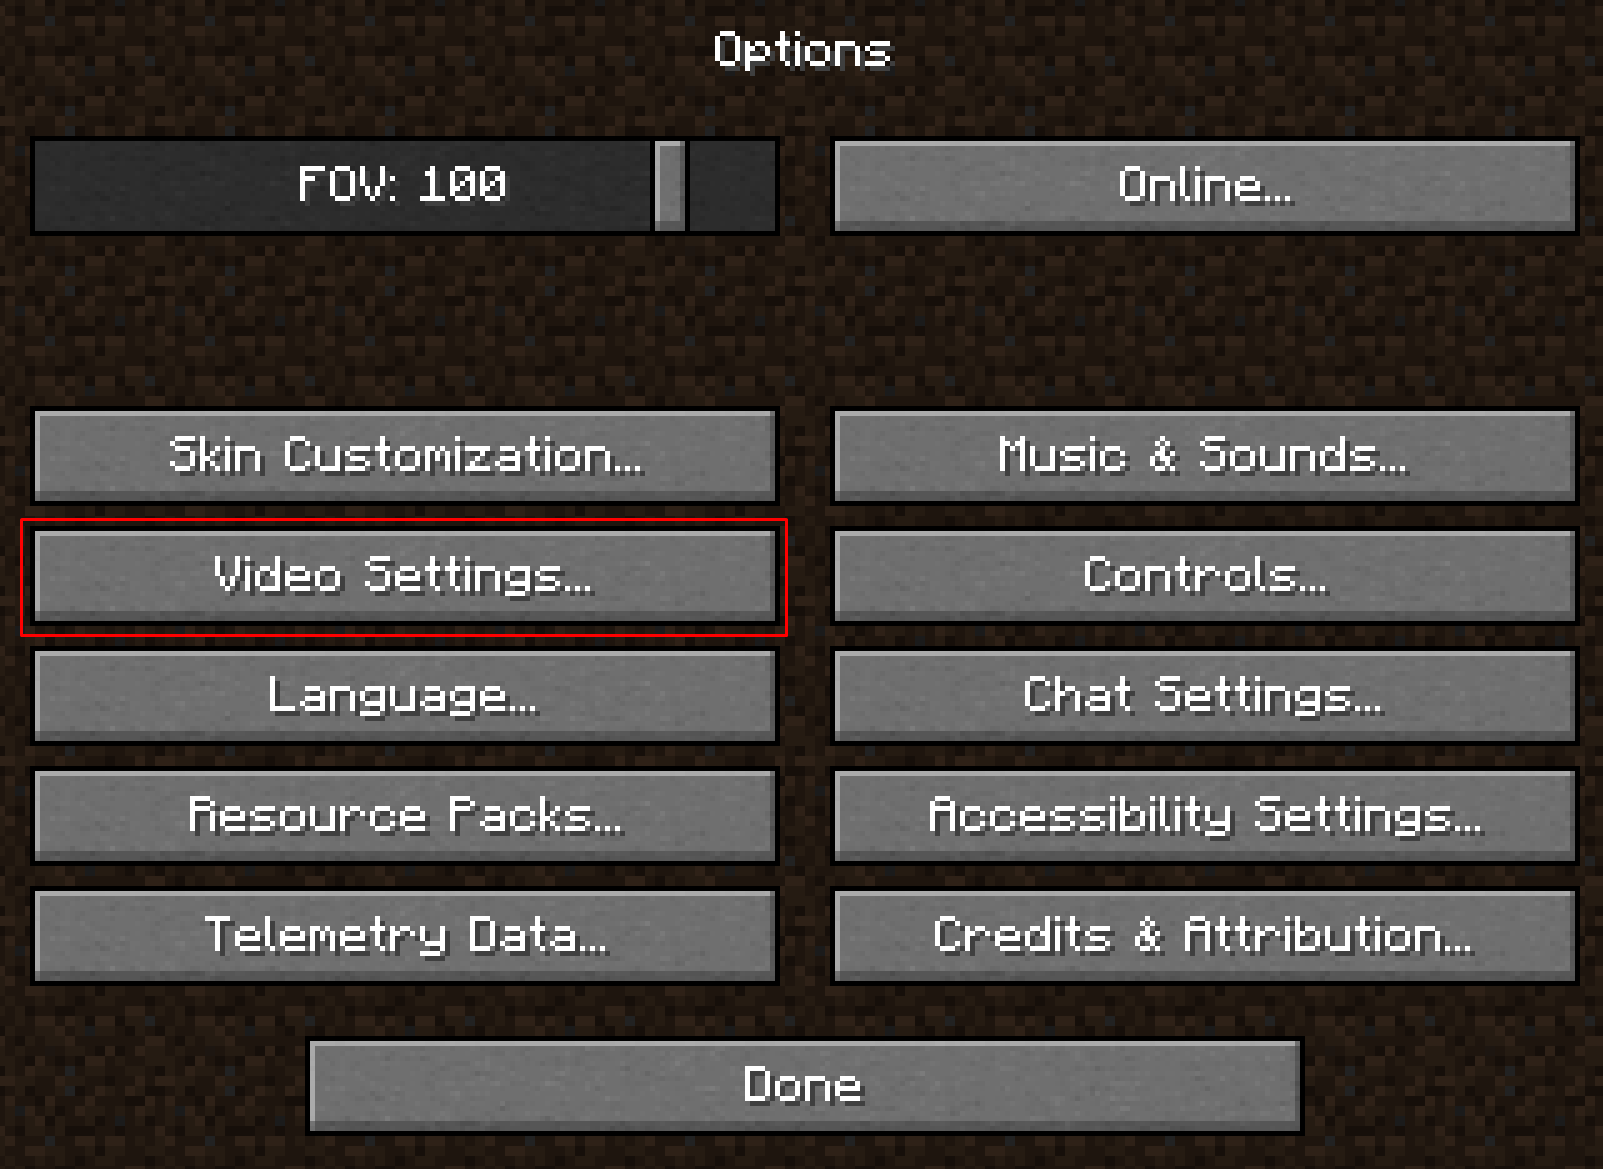
- Go to “Options” > “Video Settings” > “Shaders.”
- Click “Shaders Folder.” This opens the folder where shaders go.
- Move the ZIP file you downloaded into this folder.
Step 4: Activate The Shader Pack
- Return to Minecraft. The shader pack should appear in the list.
- Click the shader pack to activate it.
- Wait a few seconds. Your game will reload with the new graphics.
Step 5: Adjust Settings For Best Performance
Shaders can slow down your game. Adjust settings for smoother play.
- Lower “Render Distance” in Video Settings.
- Turn off extra effects (like motion blur or depth of field) in the shader options.
- Try “Lite” versions of shaders for older computers.
If your game crashes or looks strange, try another shader pack or update OptiFine.
Common Problems And How To Fix Them
Installing shaders is not always smooth. Here are some common issues and solutions.
- Game crashes or won’t start: This usually means your graphics card is not strong enough or your drivers are old. Update your graphics drivers or use a lighter shader pack.
- Black screen: Sometimes, shaders use features your computer does not support. Try a different shader or update OptiFine.
- Missing textures: Some shaders need extra files or resource packs. Check the shader’s website for requirements.
- Low FPS (frames per second): Lower your settings. Reduce render distance and turn off fancy effects.
- Shader pack not showing up: Make sure the shader file is a ZIP and in the correct folder. Restart Minecraft if needed.
| Problem | Cause | Fix |
|---|---|---|
| Crash on launch | Old drivers/unsupported hardware | Update drivers/use lighter shaders |
| Black screen | Missing shader support | Try different shader/update OptiFine |
| Low FPS | High settings | Reduce settings/use Lite shaders |
| Missing textures | Shader requires extra files | Add resource packs/check requirements |
| Shader not showing | Wrong folder/file format | Move ZIP to shaders folder/restart game |
Many beginners miss that some shaders need specific OptiFine versions. Always check compatibility before installing. Another common mistake is forgetting to update graphics drivers. This can cause crashes and glitches. Keeping your drivers updated is important for any modding.
Credit: www.namehero.com
How To Install Shaders On Minecraft Forge
Some players use mods with Forge. You can install shaders with Forge, but the process is slightly different.
- Install Forge for your Minecraft version.
- Download and install OptiFine as a mod (place the OptiFine JAR file in the “mods” folder).
- Start Minecraft with the Forge profile.
- Follow the same steps as above to add shader packs.
Note: Some mods may conflict with shaders. If you have problems, remove other mods and test again. Also, Forge updates often. Make sure all your mods, including OptiFine, match the same Minecraft version.
Installing Shaders On Minecraft Bedrock Edition
Most shaders are for Java Edition. Bedrock Edition has limited support. The process is different and often more complicated.
- Find a shader pack made for Bedrock (sometimes called “resource packs”).
- Download the shader pack. It will be a .mcpack or .zip file.
- Open Minecraft Bedrock.
- Go to “Settings” > “Storage” > “Resource Packs.”
- Import the shader pack.
- Activate the pack in your world settings.
Bedrock shaders are less advanced. You won’t get all the effects like moving shadows or advanced water. Still, they can improve lighting and colors.
:max_bytes(150000):strip_icc()/how-to-install-minecraft-shaders-12-0a64db98a4c746bd84c472a9f03d82a2.jpg)
Credit: www.lifewire.com
Advanced Tips For Using Minecraft Shaders
Once you install shaders, you might want to go further. Here are some advanced tips:
- Customize shader settings: Most shaders have settings for color, brightness, effects, and more. Experiment to find the look you want.
- Use resource packs with shaders: Combining shaders with texture/resource packs can make Minecraft look even better.
- Try different shader versions: Many packs offer “Lite,” “Medium,” and “Extreme” versions. Test them to see what works best.
- Update regularly: Shader creators update their packs to fix bugs and add features. Check for new versions every few months.
- Record videos and take screenshots: If you make YouTube videos or share on social media, shaders make your content stand out.
- Join online communities: Sites like Minecraft Forum or Reddit have tips and troubleshooting advice. You can also see screenshots from other users.
An often-missed insight is that some shaders allow you to change settings in real time. For example, BSL shaders let you adjust water color and cloud style without restarting the game. Another tip: for multiplayer, make sure the server supports mods if you want to use shaders.
Performance: How Shaders Affect Your Game
Shaders can make Minecraft run slower. This happens because shaders use more computer power. If you notice lag or slow gameplay, try these tips:
- Lower Minecraft’s graphics settings.
- Use a shader’s “Lite” version.
- Close other programs while playing Minecraft.
- Upgrade your graphics card if possible.
You can check your FPS (frames per second) by pressing F3 in-game. If FPS is below 30, the game may feel slow. Most players aim for 60 FPS.
Here’s a comparison of how different shader packs affect performance:
| Shader Pack | Average FPS (High-end PC) | Average FPS (Low-end PC) | Visual Quality |
|---|---|---|---|
| SEUS | 80 | 25 | Very High |
| Sildur’s Lite | 120 | 40 | Medium |
| BSL | 90 | 30 | High |
| KUDA | 85 | 28 | High |
| Chocapic13 Lite | 130 | 45 | Medium |
These numbers are estimates. Your FPS will depend on your computer. If you want smooth gameplay, start with a lighter shader and test.
Credit: www.youtube.com
Safety: How To Avoid Risks When Installing Shaders
Installing shaders is safe if you follow smart steps. However, there are risks.
- Download shaders from trusted sites: Only use well-known websites, like CurseForge, Planet Minecraft, or official shader sites.
- Check files for viruses: Scan files with your antivirus before opening.
- Backup your game: Always save your worlds before installing new shaders.
- Update Minecraft and OptiFine: Using old versions can cause crashes.
A common mistake is downloading shaders from random websites. This can lead to malware or broken files. Stick to official sites and scan every download.
Another tip: If you share your computer, ask before installing anything. Some shader packs change system files, which can cause problems.
For more details on Minecraft mods and safety, you can check the official Minecraft Wiki.
How To Remove Or Switch Shaders
Sometimes you want to try new shaders or remove them. Here’s how:
- Open Minecraft with OptiFine.
- Go to “Options” > “Video Settings” > “Shaders.”
- Click “None” to turn off shaders.
- To try a new shader, click its name in the list.
- To remove a shader pack, delete its ZIP file from the shaders folder.
If Minecraft crashes after changing shaders, restart your computer and try again. Removing shaders is easy and safe, so you can experiment without worry.
Frequently Asked Questions
What Are The Best Shaders For Low-end Pcs?
Chocapic13 Lite and Sildur’s Lite are good choices. They offer improved graphics without slowing your game too much. Always test different packs to see which works best for your computer.
Can I Use Shaders With Other Mods?
Yes, but you need OptiFine installed through Forge. Some mods may conflict with shaders. If you have problems, remove other mods and test again. Always check compatibility for each mod.
Why Do My Shaders Make Minecraft Look Strange?
This usually means your shader pack is not compatible with your Minecraft or OptiFine version. Check the shader’s website for supported versions. Updating your graphics drivers can also help.
Are Shaders Available For Minecraft Bedrock Edition?
Some shaders are available, but they are not as advanced as Java Edition shaders. Bedrock shaders are called resource packs. Effects are limited, but you can still improve lighting and colors.
Is It Safe To Install Shaders?
Yes, if you download from trusted sites and scan files for viruses. Always backup your game before installing new shaders. Avoid random or unknown websites to stay safe.
Installing shaders in Minecraft is a step that opens up a new world of visuals. Whether you are a builder, explorer, or just want to enjoy sunsets, shaders make the game better. The process can be tricky, but with careful steps, anyone can do it.
Remember to test different packs, adjust settings, and always keep your files safe. Once you find the right shader, Minecraft will look and feel brand new.