

Minecraft is more than just a game about building and exploring. Many players spend hours learning how to grow crops, breed animals, and automate resources. Minecraft farming is a core part of survival, creativity, and even multiplayer fun. Whether you want to survive longer, trade with villagers, or decorate your world, farming offers endless possibilities. But with so many crops, animals, and methods, it’s easy to get lost or miss important tricks. This guide gives you everything you need to know about Minecraft farming, from basics to advanced automation, so you can harvest more and waste less time.
Understanding Minecraft Farming Basics
Minecraft farming means growing plants, raising animals, and collecting resources. It’s not just for food—farming provides building materials, trading goods, and items for crafting. In survival mode, farming is essential if you want to avoid hunger, heal, or make potions.
Farming is available very early in the game, which makes it a great way to get started. Even before you find iron or diamonds, you can already be growing wheat and keeping a few chickens. Farming also helps you become self-sufficient, so you don’t have to search for food every day.
As you advance, farming becomes more than just survival—it’s a way to earn emeralds, craft new items, and create impressive builds.
Types Of Farming In Minecraft
There are three main types:
- Crop farming—growing plants like wheat, carrots, and potatoes.
- Animal farming—breeding animals for food, wool, leather, and other resources.
- Resource farming—collecting items like wood, cactus, and sugar cane.
Each has its own rules, tools, and best practices.
But within these types, there are many sub-types. For example, crop farming can include both basic food crops and special plants like nether wart or chorus fruit. Animal farming might focus on cows and sheep at first, but later you might breed horses or bees.
Resource farming is not just about wood—you can also grow mushrooms, bamboo, or even farm mobs for unique drops.
Why Farming Matters
Farming is more than survival. It lets you:
- Trade with villagers for rare items.
- Build with materials like wool or hay.
- Make potions and food that boost health.
- Automate resource collection for bigger builds.
When you have a steady farm, you can focus on exploring caves or building large projects, without worrying about food. Many beginners focus only on food, but smart farming can speed up your progress and unlock new possibilities.
Farming also gives you control over your world. Instead of depending on luck to find resources, you can create renewable supplies. For example, you can farm pumpkins for jack-o-lanterns, or breed sheep of different colors for banners and beds. You can also use farming to make your base unique, adding flower gardens, animal pens, or crop fields that show your style.
Crop Farming: Getting Started
Crop farming is the simplest way to begin. You just need seeds, soil, and water. But there are tricks to make your crops grow faster and yield more.
Crop farming is a favorite for new players because it’s easy to understand and quick to set up. Even a small patch of wheat can help you survive your first nights. But if you want to get the most out of your farm, it’s important to know how different crops work and how to lay out your fields.
Essential Crops
The most common crops are:
- Wheat—used for bread, cake, and breeding animals.
- Carrots—good for food and breeding pigs.
- Potatoes—can be eaten or baked for more hunger points.
- Beetroot—used in soup and as a trading item.
- Pumpkins and Melons—for food, crafting, and decoration.
Some crops like nether wart and cocoa beans are special and need unique conditions.
Wheat is one of the easiest crops to start with, as you get seeds just by breaking grass. It’s also very versatile—besides making bread, you need wheat to breed cows and sheep. Carrots and potatoes are often found in villages, so exploring can help you get these crops early.
Beetroot is less common but useful for certain recipes and trading. Pumpkins and melons grow from a stem, so they need space next to them for the fruit to appear. Melons are handy for healing potions, while pumpkins are used for snow golems, iron golems, and decorative blocks.
Nether wart is only found in the Nether and is needed for potion brewing. Cocoa beans grow on jungle wood and are used for cookies and dye.
Tools And Materials Needed
To start crop farming, you’ll need:
- Hoe—to prepare soil.
- Seeds—wheat, carrot, potato, beetroot, etc.
- Water—crops grow faster near water.
- Light—crops need light to grow, especially underground.
Hoes come in different materials: wood, stone, iron, gold, and diamond. A better hoe lasts longer, but all hoes work the same for planting. For beginners, a wooden or stone hoe is enough. Always carry a bucket to move water if you want to farm far from rivers or lakes.
Lighting is important, especially if you farm indoors or underground. Torches, lanterns, glowstone, or even jack-o-lanterns can keep your crops growing at night or in caves. Without light, crops will grow very slowly or not at all.
How To Plant Crops
- Craft a hoe (wood, stone, iron, or diamond).
- Right-click on grass or dirt to turn it into farmland.
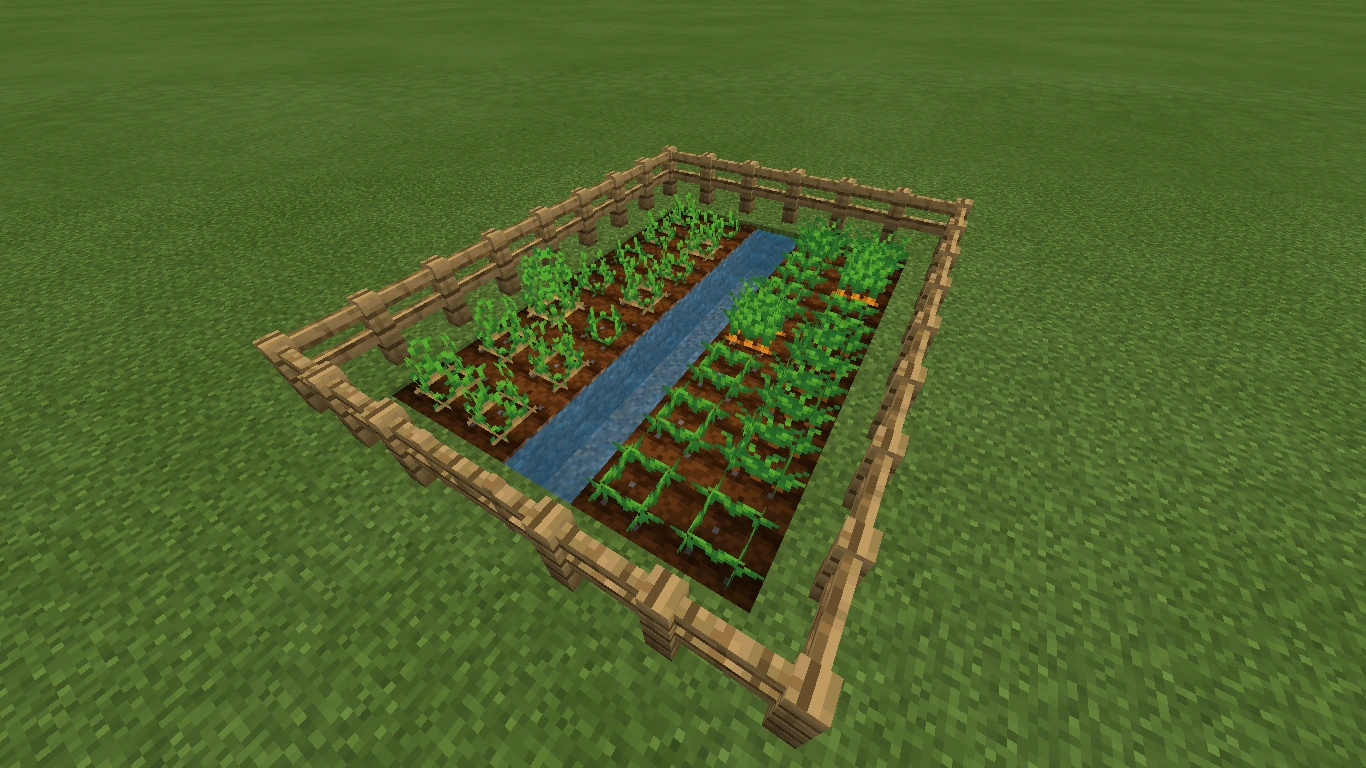
- Place water nearby (within 4 blocks) to keep farmland moist.
- Plant seeds by right-clicking on the farmland.
- Add torches or glowstone for light if underground.
- Wait for crops to grow. Harvest when fully grown.
If you jump on farmland, it turns back to dirt, so build paths or fences to avoid trampling your crops. Crops have several growth stages. For wheat, the final stage is golden brown. Potatoes, carrots, and beetroot also change color when ready.
Harvest fully grown crops with your hand or any tool (not a hoe—save its durability). Wheat drops seeds, potatoes drop extra potatoes, and carrots drop more carrots. Always replant right away for a steady supply.
Growth Rates And Optimization
Most crops take about 5–10 minutes to grow in ideal conditions. Water, light, and space matter. Here’s a quick comparison:
| Crop | Growth Time (minutes) | Water Needed? | Light Level |
|---|---|---|---|
| Wheat | 7–10 | Yes | 9+ |
| Carrot | 7–10 | Yes | 9+ |
| Potato | 7–10 | Yes | 9+ |
| Beetroot | 7–10 | Yes | 9+ |
| Pumpkin | 10–30 | Yes | 9+ |
| Melon | 10–30 | Yes | 9+ |
| Nether Wart | 10–20 | No | Any |
Not all crops grow at the same speed. Pumpkins and melons are slower, as the stem grows first, then the fruit appears. If you want a quick food source, stick to wheat, carrots, or potatoes.
Two details beginners miss:
- Crops grow faster if planted in rows with empty blocks or other crops in between, due to Minecraft’s block update rules.
- Growth only happens if the player is nearby (within 128 blocks horizontally, 32 vertically). If you spend hours far from your farm, crops won’t grow.
Advanced Planting Layouts
Planting crops in rows with water every fourth block is the most efficient. Some players use checkerboard patterns for pumpkins and melons. Try compact layouts to save space and speed up harvesting.
For example, a classic 9×9 plot with a single water block in the center can hydrate the entire field. This saves space and water buckets. For pumpkins and melons, a checkerboard layout (alternating stems and empty spaces) ensures each stem has a place for fruit to grow.
Vertical or multi-level farms are great if you have limited ground space. Stack layers with water between each floor. Just remember to light each level.
Fertilizer And Speed Boosts
Bone meal is the main fertilizer. Right-click crops with bone meal to instantly grow them. Use bone meal wisely; it’s made from skeleton bones and can be rare early in the game.
Bone meal works on most crops, but not on nether wart. It’s especially useful if you need food fast or want to decorate with tall grass and flowers. If you have a skeleton farm, you’ll have an endless supply of bone meal.
You can also get bone meal from composters—put extra seeds or crops in a composter until it fills up, then collect bone meal.
Another trick: bees can help crops grow faster by pollinating them. If you have a bee hive near your farm, you may notice crops growing at double speed.
Animal Farming: Raising And Breeding
Animal farming is a step up from crops. You get food, materials, and can even ride some animals. But managing animals takes more planning.
Animal farming is rewarding because it gives you resources that crops can’t provide, like leather, wool, feathers, and milk. Animals can also be pets, or even used for transport.
Common Farm Animals
- Cows—give beef, leather, and milk.
- Pigs—give pork and can be ridden.
- Sheep—give wool and mutton.
- Chickens—give eggs, feathers, and chicken meat.
- Rabbits—give rabbit meat and fur.
- Horses—can be ridden; give leather.
- Bees—produce honey and pollinate crops.
Each animal has unique uses. For example, cows are the best source of leather for books and item frames, while sheep provide colored wool for banners and beds. Chickens are great for automated egg farms, and bees are the only way to get honey and honeycomb.
How To Start An Animal Farm
- Build a fence or pen to keep animals from escaping.
- Find animals in the wild and lead them with their favorite food:
- Wheat for cows and sheep.
- Carrots for pigs and rabbits.
- Seeds for chickens.
- Bring at least two animals into your pen.
- Feed them their favorite food to breed new babies.
- Wait for babies to grow (takes about 20 minutes).
Fences are essential because animals wander away or fall into holes. Gates let you enter without letting animals out. If you have leads (from wandering traders), you can tie animals to fences.
A tip: breed more than two animals at a time. The more animals you have, the faster your farm grows. But don’t make pens too small—overcrowded animals can suffocate or cause lag.
Animal Breeding Tips
Breeding animals gives you more resources. Each animal has a cooldown—you must wait a few minutes before breeding again. Keep a steady supply of food to keep your farm growing.
You can speed up baby growth by feeding them more of their favorite food. For example, feed wheat to a baby cow to make it grow faster. This is helpful if you want a large farm quickly.
Animals will follow you if you hold their food. This can be used to move them long distances, even across rivers (build a bridge or push them in boats). Chickens are easy to transport because they are attracted to any kind of seed.
Managing Animal Farms
Animals can overcrowd pens, causing lag or slow growth. Keep your pens large enough and avoid having too many animals in one place.
Minecraft limits the number of animals in a small area, and too many can cause performance problems. Try to keep each pen below 24 animals. If you need more, build extra pens or move animals to a separate breeding area.
Clean up dropped items (like eggs or wool) regularly, or use hoppers to collect them. Keep pens well lit to prevent hostile mobs from spawning.
Harvesting Animal Resources
Some resources are renewable:
- Milk from cows (right-click with bucket).
- Eggs from chickens (collected every few minutes).
- Wool from sheep (shear with scissors).
Others require killing animals:
- Beef, pork, mutton, leather, feathers.
Shearing sheep doesn’t hurt them and is the best way to get colored wool. Eggs are useful for making cakes and breeding more chickens. Milk is used to cure potion effects and make cakes.
When harvesting animals for meat or leather, always breed new ones first. This keeps your farm sustainable.
Bees: Special Farming
Bees are unique. They pollinate crops and give honey. Place flowers near bee hives to attract bees. Collect honey with bottles and honeycomb with shears. Bees can help crops grow faster, but can sting if provoked.
To move bees, use a silk touch tool to pick up hives at night (when bees are inside). Place hives near your crops for extra growth speed. Always place campfires under hives before collecting honey or honeycomb—otherwise, bees become angry and attack.
Bees are helpful for automated farms, as they can pollinate large areas if you have enough flowers. Honey blocks are also useful for redstone builds.
Resource Farming: Wood, Sugar Cane, And More
Resource farming means collecting materials beyond food and animals. Some of these are key for building, trading, and crafting.
Resource farming helps you avoid running out of important materials. Instead of searching for trees, cactus, or sugar cane, you can set up a farm and harvest as much as you need.
Wood Farming
Trees are the main source of wood. Plant saplings, wait for them to grow, then chop them down. Different trees give different wood types:
- Oak
- Birch
- Spruce
- Jungle
- Acacia
- Dark Oak
Plant saplings with at least one block of space on all sides. Chop down trees and replant saplings for an endless supply.
Some trees, like jungle and dark oak, require 2×2 saplings to grow. Oak trees sometimes drop apples, which are used for golden apples. Birch and spruce are good for building because of their unique colors.
For large-scale wood farms, build a grid of saplings with enough space between them. Use axes with the Efficiency enchantment for faster chopping. If you have villagers, you can trade wood products for emeralds.
Sugar Cane Farming
Sugar cane grows on sand or dirt next to water. Plant sugar cane, wait for it to grow 3 blocks tall, then harvest the top two blocks. Sugar cane is used for:
- Paper (for books and maps)
- Sugar (for food and potions)
A good tip is to plant sugar cane in long rows along rivers or lakes. You can harvest hundreds of sugar cane in minutes if you plan your farm well.
Sugar cane grows faster in some biomes, like deserts, due to higher random tick rates. But water is always needed.
Cactus Farming
Cactus grows only on sand. Place each cactus block with no adjacent blocks (except above and below). Cactus is used for green dye and as a defense.
Cactus will break and drop itself if any block is placed next to it. This makes it easy to automate cactus farms by placing fences or blocks next to growing cactus. Use hoppers or water streams to collect the dropped cactus.
Cactus farms are great for making green dye or for trash disposal—items thrown onto cactus are destroyed.
Bamboo And Other Resources
Bamboo grows fast and can be used for scaffolding, sticks, and fuel. Plant bamboo on any dirt or sand block. Harvest tall bamboo for maximum yield.
Bamboo is the fastest-growing plant in Minecraft. You can use it for scaffolding, which is useful for building tall structures, or as fuel in furnaces (smelts 0. 25 items per bamboo).
Other farmable resources include kelp (grows underwater, used for food and fuel), sweet berries (grow in taiga biomes, used for food and decoration), and vines (grow on walls, harvested with shears for decoration).
Mushroom Farming
Mushrooms need low light. Place mushrooms in caves or use mushroom blocks for larger farms. Mushrooms are used for stew and potion ingredients.
Mushrooms spread slowly but can be farmed in dark rooms or under trees. If you use bone meal on a mushroom in low light, it becomes a giant mushroom, which gives many mushrooms when chopped down.
Mushroom stew is a cheap and easy food source if you have both red and brown mushrooms.
Automatic Farming: Redstone And Mechanisms
Manual farming is slow. Automatic farming uses redstone, pistons, and water to harvest crops or resources without much effort.
Automatic farms save time, especially if you need large amounts of food or materials. Once set up, they can run while you do other things, collecting resources passively.
Basic Automatic Crop Farms
Use water and pistons to harvest crops:
- Plant crops in rows.
- Place water above or beside the crops.
- Use redstone and a lever to release water, washing the crops into a collection area.
- Use hoppers to collect drops into chests.
This system is easy to build and works for wheat, carrots, potatoes, and beetroot. When you flip the lever, water flows over the farmland, breaking the crops. After collecting, replant seeds for the next harvest.
For early automation, even just a simple water stream can help—break crops manually, then let water push items to you.
Automatic Animal Farms
Automation is harder for animals, but you can:
- Use dispensers with water buckets to move animals.
- Use hoppers to collect eggs, wool, or drops.
For chickens, build an egg farm with hoppers under the floor. For sheep, use dispensers with shears and observers to shear sheep automatically when their wool grows back.
Some advanced players build mob grinders—structures that spawn and kill animals for drops. These can be complex and require careful design.
Sugar Cane And Bamboo Farms
Automatic farms use observers to detect when sugar cane or bamboo grows tall. The observer triggers a piston, breaking the plant and dropping it into a hopper.
This system is compact and easy to expand. Observers detect changes in the plant’s height and activate pistons instantly. For large farms, use minecart hoppers underneath to collect all the drops.
Remember: sugar cane and bamboo only grow when you are nearby, so build these farms close to your base.
Advanced Redstone Farms
Some players build huge farms with hundreds of blocks, using minecart systems, sorting machines, and timers. These farms can produce thousands of items per hour.
For example, a fully automatic wheat farm may use villagers as farmers, minecarts to collect dropped crops, and item sorters to organize everything. Large animal farms may use lava blades and water channels to process animals automatically.
Building these farms requires practice with redstone, hoppers, and timing circuits. Start small and learn the basics before attempting mega-farms.
Comparing Manual Vs Automatic Farming
Let’s look at efficiency:
| Farm Type | Yield per Hour | Labor Needed | Setup Difficulty |
|---|---|---|---|
| Manual Crop Farm | 100–200 items | High | Easy |
| Automatic Crop Farm | 500–1000 items | Low | Medium |
| Manual Animal Farm | Varies | High | Easy |
| Automatic Animal Farm | Varies | Low | Hard |
| Sugar Cane/Bamboo Auto Farm | 500–2000 items | Low | Medium |
While automatic farms are more complex to build, they save hours over time. Manual farms are good for beginners or small-scale needs.
Common Mistakes In Automation
Beginners often:
- Forget to replant crops after harvest.
- Build farms too far from their main base (crops only grow when nearby).
- Use too few hoppers, causing items to despawn.
- Overcomplicate redstone circuits.
Start small and expand as you learn.
Another common mistake: not lighting up your automatic farms. If hostile mobs spawn in your farm, they can break crops or attack you while harvesting. Always place torches or other light sources.
A non-obvious insight is that automation should only be added when you need it. Overbuilding can waste resources early in the game. Focus on making your manual farm efficient before investing in redstone and moving parts.
Villager Farming: Trading And Benefits
Villagers are useful for trading and farming. Some villagers farm crops, while others trade for rare items.
Villager farming combines crop production with trading, giving you access to emeralds and rare goods. Villager farms can be automated and are vital for mid- to late-game progress.
How Villager Farming Works
Villagers with the farmer profession will plant and harvest crops in their village. They use wheat, carrots, potatoes, and beetroot.
Farmers pick up seeds and crops, plant them, and sometimes share with other villagers. If you set up a collection system (like a hopper minecart under the farm), you can gather the crops they drop.
Villager farmers need a composter block to become a farmer. Place one nearby to assign the profession.
Trading With Villagers
Villagers offer trades for:
- Emeralds
- Food
- Rare items (enchanted books, tools)
Create a trading hall with multiple villagers to maximize trades.
Trading is often overlooked by beginners. But with a good farm and a few villagers, you can get enchanted gear, rare blocks, and more without leaving your base. For example, librarians sell enchanted books, while farmers buy crops and sell food.
Trading also levels up villagers, unlocking better trades as you use them more.
Automatic Villager Crop Farms
Villagers can be used to make automatic farms:
- Place a farmer villager in a fenced area with crops.
- Add a second villager or a collection system.
- The farmer harvests crops and drops them for collection.
Some advanced farms use a hungry villager in a pit; the farmer tries to share crops, which are collected by hoppers. This gives you a steady supply of food without replanting.
Villager farms are efficient, but keep them safe from zombies and raids. Place walls, doors, or iron golems nearby.
Maximizing Villager Farming
- Make sure villagers have enough beds and workstations.
- Protect villages from zombies and raids.
- Trade regularly to unlock better deals.
Villagers need access to beds to rest and to breed new villagers. The more beds and workstations, the larger your village can be.
A tip: keep your villagers happy. If you hit them or let mobs attack, they may raise prices or lose their jobs. Protect your trading hall with walls and lighting.
Credit: minecraft.fandom.com
Farming In Different Biomes
Biomes affect farming. Some crops grow faster or slower depending on location.
Your choice of biome can make farming easier or harder. Some biomes have more animals, while others offer unique plants.
Plains And Forests
Most crops grow well in plains and forests. Animals spawn often, and water is easy to find.
Plains are the best biome for starting a farm—flat land, lots of grass for seeds, and plenty of animals. Forests have more trees, so wood is easy to gather. Both biomes are safe from extreme weather and have enough light for crops.
Desert And Savanna
Deserts are harder. Water is rare, but cactus and sugar cane grow well. Savanna is good for acacia wood and certain animals.
You’ll need to bring water to your desert farm, but you can grow cactus and sugar cane easily. Savannas have lots of grass and acacia trees, and are good for finding horses.
Swamp And Jungle
Swamps have more mushrooms and clay. Jungles offer cocoa beans, melons, and bamboo.
Jungles are dense, so clearing space for farms can be hard. But they are the only place to get cocoa beans and jungle wood. Swamps are great for mushroom farming and finding slimes at night.
Taiga And Snow Biomes
Cold biomes are tough. Crops need extra light, and water freezes. Use torches or lanterns to keep water unfrozen.
In taiga and snowy tundra, you’ll need to cover your water with slabs or glass to stop it freezing. Crops grow slower in cold, but potatoes do well in taiga. Sweet berries are unique to taiga biomes.
Nether Farming
Some crops, like nether wart, only grow in the Nether. Lava and dangerous mobs make farming risky.
You can build nether wart farms in the overworld if you bring back soul sand. But nether farming is always risky—bring armor and weapons.
Comparing Crop Growth In Biomes
Here’s a quick biome comparison:
| Biome | Crops Grown Easily | Special Challenges |
|---|---|---|
| Plains | All | Few |
| Desert | Cactus, Sugar Cane | Lack of Water |
| Jungle | Cocoa, Melon, Bamboo | Dense Trees |
| Taiga | Wheat, Potato | Frozen Water |
| Nether | Nether Wart | Danger |
If you want the easiest start, pick plains or forest for your first farm. Move to other biomes as you need special crops.
Sustainable Farming: Keeping Farms Efficient
Smart farming means balancing resources and space. You want steady food, materials, and items without wasting time or blocks.
Sustainable farms let you play longer without running out of food or materials. They also help prevent waste and keep your base organized.
Crop Rotation And Diversity
Don’t plant only one crop. Rotate wheat, carrots, and potatoes for more trading options and food variety. Use pumpkins and melons for decoration and crafting.
Different crops give different benefits. Wheat is good for breeding, while potatoes and carrots are better for eating. Melons and pumpkins add variety and can be traded with villagers.
Crop rotation also prevents boredom and keeps your farm interesting. If you have extra seeds, use them in a composter for bone meal.
Space Management
Keep farms close to your main base. Crops only grow when you’re nearby. Use compact layouts and stack farms vertically if you lack space.
A trick is to build farms under your house or even inside walls. Vertical farms save space and look impressive. If you build farms in loaded chunks, they keep producing while you’re in your base.
If you play on a server, ask about chunk loaders—special blocks or commands that keep areas active.
Renewable Resources
Focus on crops and animals that can be replanted or bred. Avoid relying on rare items or mobs.
Renewable resources save time and reduce stress. For example, farm cows for leather instead of hunting wild animals. Grow trees for wood instead of stripping forests.
Always keep a few seeds or saplings in storage in case you lose your farm.
Composting
Use a composter to turn extra crops into bone meal. This gives you fertilizer and reduces waste.
Composters accept most plant items. Fill them up and collect bone meal for instant crop growth or flower farming.
Protecting Your Farms
Build fences, walls, or use cats to keep away hostile mobs like zombies or creepers. Light up your farm to prevent monsters from spawning.
Cats scare away creepers, so place a few around your farm. Iron golems can protect larger farms or villages. Fences keep animals in and mobs out.
A non-obvious tip: use carpet on top of fences to jump over without letting animals escape.
Water Management
One water block hydrates farmland within 4 blocks. Place water efficiently to cover more area.
Cover water with slabs, trapdoors, or lily pads to walk over it without falling in. Use buckets to move water where you need it.
Automation And Upgrades
Upgrade farms with redstone as you get resources. Start manual, then automate for bigger yields.
Don’t rush automation. Make sure your manual farm is productive before investing in complex builds.
Farming For Food: Best Crops And Meals
Food is essential for survival. Not all foods are equal. Some meals restore more hunger or health.
Eating the best foods means you spend less time eating and more time playing. Some foods also give special effects, like regeneration or night vision.
Top Food Sources
- Baked potato—easy to farm, restores 5 hunger.
- Bread—restores 5 hunger, made from wheat.
- Cooked beef (steak)—restores 8 hunger, best for late game.
- Cooked porkchop—restores 8 hunger.
- Cooked chicken—restores 6 hunger.
- Rabbit stew—restores 10 hunger, but complex to make.
- Pumpkin pie—restores 8 hunger, made from pumpkin, sugar, egg.
- Beetroot soup—restores 6 hunger.
Cooked meats are the best for hunger and healing, but require animal farming. Baked potatoes and bread are easy for beginners.
Golden apples and golden carrots give special effects, but are expensive. Use them for boss fights or emergencies.
Cooking And Preparation
Use a furnace to cook meat and potatoes. Craft bread and stews in the crafting table.
You can automate cooking with a smoker (faster for food) or a campfire (cooks food without fuel, but is slower). Cooking food always gives more hunger and better healing than eating it raw.
Special Meals
Some meals, like golden apples and golden carrots, give extra health or buffs. These require gold and are rare.
Golden apples heal and give absorption hearts. Golden carrots give high saturation (slow hunger loss) and are used in brewing night vision potions.
Rabbit stew and beetroot soup restore lots of hunger, but take up more inventory space since they don’t stack.
Food For Breeding
Keep enough wheat, carrots, and seeds for breeding animals. Don’t eat all your crops—save some for your farm.
If you run out of breeding food, your animal farm stops growing. Always store extra in a chest near your farm.
Avoiding Food Waste
Don’t harvest more than you need. Store extra food in chests. Compost unused crops for bone meal.
Rotating crops and using composters helps keep your farm clean and efficient. If you have too much of one food, trade it with villagers or other players.
Decorative Farming: Gardens And Aesthetics
Farming isn’t just practical. Many players build gardens, flower beds, and scenic farms for beauty.
Decorative farms can turn your base into a stunning landscape. Flower gardens and orchards make your world feel alive.
Flower Farming
Grow flowers for dyes and decoration. Use bone meal on grass for random flowers.
Each biome produces different flowers. Plains give poppies and daisies, while forests offer blue orchids and alliums. Collect all flower types for a colorful garden.
Flowers are also used to breed bees and craft banners.
Bushes And Hedges
Use leaves, bushes, and hedges to decorate paths and farms.
Shear leaves from trees and place them as hedges around your farm. This keeps animals in and adds a natural look.
Berry bushes from taiga biomes are both decorative and a food source.
Water Features
Add ponds, fountains, or waterfalls to make farms look nicer.
Water features improve the look of your farm and help hydrate crops. Use lily pads or slabs to walk over water.
Fountains can be made with stone and water, and add a relaxing sound to your base.
Paths And Fences
Use wooden planks, stone, or gravel for paths. Fences keep animals in and mobs out.
Paths lead visitors to your farm and make harvesting easier. Combine different block types for a unique style.
Add lanterns or torches along paths for safety and beauty.
Creative Farm Builds
Try building:
- Hanging gardens
- Vertical farms
- Rooftop farms
- Farmhouses
Farming can be part of your creative building style.
For example, a rooftop farm on your house saves space and looks impressive. Hanging gardens use chains and blocks to create floating farms.
Add scarecrows (armor stands with pumpkin heads) for fun.
Farm Expansion: Scaling Up
As you progress, you’ll want bigger farms. Scaling up means more resources, automation, and organization.
Big farms let you trade more, build bigger projects, and supply other players.
Planning Large Farms
- Map out space before building.
- Use chunk borders for maximum efficiency (crops grow only in loaded chunks).
- Build storage rooms near farms.
Plan paths and lighting before starting. Large farms need clear organization to avoid getting lost.
Sorting Systems
Use hoppers, chests, and item sorters to keep crops organized.
Item sorters use redstone to send items into the right chest. For example, wheat goes in one chest, seeds in another.
Large storage rooms keep your harvest safe and easy to find.
Farm Networks
Connect farms with minecart tracks or paths for easy access.
Minecarts can carry crops or animals between farms. Paths help you move quickly and avoid trampling crops.
If you play with others, build roads or tunnels to connect your farms.
Upgrading Tools
As you get more resources, use diamond or netherite tools. Enchant hoes with Unbreaking and Efficiency for faster farming.
An Efficiency V hoe clears fields instantly. Fortune on a hoe gives more crops per harvest.
Hiring Helpers
In multiplayer, assign farm duties to different players. Share food and materials.
Dividing labor makes big farms easier to manage. Some players plant, others harvest, and others breed animals.
Rare And Special Farms
Some farms are hard to build or require rare items.
Special farms give you resources you can’t get anywhere else.
Nether Wart Farm
Grow nether wart only on soul sand in the Nether or overworld. Needed for potions.
Nether wart does not need water or light, but grows faster in the Nether. Always keep a supply for brewing.
Chorus Fruit Farm
Chorus fruit grows in the End. Plant chorus flowers on End stone.
Chorus fruit is used to make popped chorus fruit (for end rods and purpur blocks). The plants grow tall and spread, so build your farm in an open area.
Slime Farm
Slimes spawn in certain chunks. Dig out large areas and build platforms for slime spawning. Slime balls are used for sticky pistons.
Slime farms are technical and require mapping slime chunks. Use F3 in Java Edition or online tools to find slime chunks.
Mob Farms
Farm hostile mobs for drops (bones, arrows, gunpowder). Build mob traps or towers.
Mob farms are complex, but provide endless supplies of rare items. Build high up or underground for best results.
Fish Farms
Fish can be farmed with automatic fishing machines (though some methods are limited in recent versions).
Fishing farms give fish, enchanted books, and rare loot. Newer Minecraft versions require more complex designs.
Data And Statistics: Farming In Numbers
Let’s look at some numbers to help you plan.
- One water block hydrates 80 farmland blocks.
- Wheat yields 1–3 seeds per harvest.
- Villagers can harvest about 50 crops per hour.
- Cows drop 0–2 leather and 1–3 beef.
- Automatic sugar cane farms can produce up to 2000 sugar cane per hour.
Other useful numbers:
- Chickens lay 1 egg every 5–10 minutes.
- Bees fill a hive in about 2–5 minutes, depending on nearby flowers.
- Bamboo grows 1 block every 204 ticks (about 10 seconds).
Most farms are limited by proximity (crops and mobs only grow when you’re nearby). Plan your base so farms are within your active area.
A non-obvious insight: If you build farms on the edge of your base, you can load multiple farms at once by standing between them.
Common Beginner Mistakes
Many new players waste time or resources. Here are mistakes to avoid:
- Planting crops without water—slows growth.
- Building farms far from base—crops don’t grow.
- Overcrowding animals—causes lag and slow breeding.
- Forgetting light—crops don’t grow in darkness.
- Using wrong tools—never use a pickaxe on crops.
- Not replanting—farms stop producing.
- Ignoring composting—wastes excess crops.
- Forgetting to protect farms—mobs destroy plants and animals.
Another mistake: harvesting crops too early. Wait for full growth for the best yield.
Many beginners also use too many different animals or crops at once. Focus on a few, then expand as you learn.

Credit: www.youtube.com
Unique Insights And Advanced Tips
Some advanced ideas most beginners miss:
- Villager auto-farms can be built with minecart collection systems to gather dropped crops.
- Bee farms can speed up crop growth by pollination, but bees need flowers and protection.
- Chunk loading (with command blocks or mods) keeps farms active even when you’re far away. This is useful for large-scale farming.
Another advanced trick: stack farms vertically to use less space and have crops growing above and below your base.
If you automate too early, you may miss out on learning how crops and animals interact. Start simple, then add complexity as you gain experience.
Also, using waterlogged blocks (like stairs) can hydrate farmland without visible water, making your farm look cleaner.
Minecraft Farming In Multiplayer
Farming is different in multiplayer worlds. You can cooperate, compete, or trade with other players.
Working with others makes farming faster and more fun. You can specialize—some players grow crops, others breed animals, and others build automation.
Cooperative Farms
Build shared farms for food, trading, and building materials. Assign roles—some players plant, others harvest or breed animals.
Large farms can supply entire towns or factions. Shared animal pens and crop fields save space and resources.
Farm Protection
Use fences and locks to keep farms safe from griefers. On servers, ask admins for protection plugins.
Claim your land if the server allows, or build hidden farms underground. Use iron doors or traps to protect rare animals.
Trading And Economy
Large farms can power server economies. Trade crops, animal products, or rare items for resources.
Set up shops or market stalls. Trade emeralds, enchanted books, or rare foods with other players.
Farm Competitions
Some servers host farm-building contests. Show off your creativity and efficiency.
Winning a contest can earn you rewards or server fame. Use creative designs, automation, and decoration to impress judges.
Minecraft Farming And Updates
The game changes often. New crops, animals, or mechanics are added.
Keeping up with updates means your farms stay efficient and compatible. Sometimes, old redstone builds break after patches.
Recent Changes
- Bees and honey farms added in 1.15.
- Nether update added new crops like nether wart blocks.
- Caves & Cliffs added new plants and blocks.
Other recent changes include new cave plants, glowing berries, dripstone, and more. Always check update logs before starting a new farm.
Staying Up To Date
Follow the official Minecraft website or forums for news. Update your farms when new blocks or mechanics appear.
Check if your favorite farm designs still work after each patch. Some automation methods may change with updates.
Frequently Asked Questions
What Is The Best Crop To Farm For Food In Minecraft?
Baked potatoes and bread are easy to farm and restore good hunger points. For maximum healing, steak or porkchop are best, but require animal farming. Choose crops based on your resources and playstyle.
How Can I Make My Farm Automatic?
Use redstone, hoppers, observers, and pistons to build automatic farms. Start with simple water-harvest farms, then add more complexity. Sugar cane, bamboo, and melon farms are easiest to automate.
Why Are My Crops Not Growing?
Crops need water within 4 blocks, a light level of 9 or higher, and you must be nearby (within loaded chunks). Check for missing water, low light, or distance from your base.
How Do I Protect My Farm From Mobs?
Build fences, use walls, and place torches or lanterns to prevent mob spawning. Cats keep away creepers. Make sure to light up your farm area to protect crops and animals.
Are There Farming Guides Or Tutorials Online?
Yes, many guides cover farming basics, automation, and advanced techniques. The official Minecraft Wiki is a reliable source: Minecraft Wiki.
Minecraft farming is a deep and rewarding part of the game. Whether you’re growing simple wheat or building complex redstone farms, there’s always a new technique to try. Smart farming keeps you fed, helps you trade, and lets you build bigger, better worlds.
As you learn and experiment, your farms will become more productive, efficient, and beautiful. So grab your hoe, gather your seeds, and start planting—your Minecraft adventure is just beginning.

Credit: www.ign.com