

Minecraft Potions: The Complete Guide to Brewing, Using, and Mastering Effects
If you’ve ever played Minecraft, you know it’s more than building blocks and fighting mobs. One of the game’s most powerful features is potions. These magical drinks can help you survive, fight, and explore in ways normal tools can’t. Whether you’re a beginner or an advanced player, understanding potions can change your game. But with dozens of recipes, effects, and brewing steps, it’s easy to get lost or miss key advantages. This guide breaks down everything you need to know about Minecraft potions, from brewing basics to advanced tactics and rare effects. You’ll learn how to craft, use, and maximize every potion—without getting confused or overwhelmed.
What Are Minecraft Potions?
Minecraft potions are special items that give players temporary effects. You drink or splash them to gain powers like healing, speed, invisibility, or resistance. Potions can be positive (helpful) or negative (harmful). Players use them in combat, exploration, mining, and PvP. Potions are made in a Brewing Stand using ingredients found in the game. Each potion has a unique recipe, effect, and duration.
Potions are divided into three main types:
- Drinkable potions: You drink these directly for effects.
- Splash potions: Throw these to affect yourself or others nearby.
- Lingering Potions: Leave a cloud on the ground for lasting area effects.
Drinkable potions are the most common. When you drink a potion, you get the effect for yourself only. Splash potions are useful in multiplayer or when you want to affect mobs and other players. Lingering potions are more advanced—they leave a mist that stays in the area for a short time, allowing anyone who walks through to get the effect.
Potions are crucial for surviving tough battles, exploring dangerous areas, and even winning multiplayer fights. In some cases, potions can be the difference between life and death, especially in high-risk areas like the Nether or during boss fights. When you face mobs like the Ender Dragon or the Wither, having the right potion can give you a big advantage.
Another important point is that potion effects are temporary, so you need to plan when to use them. Using a potion too early or too late can waste its effect. Some players make the mistake of drinking all their potions before a fight, but it’s better to time your usage for maximum benefit.
How Brewing Works In Minecraft
Brewing is the process of making potions. It’s done with a Brewing Stand, which you craft using a Blaze Rod and three Cobblestone blocks. The stand lets you combine water bottles and magical ingredients to create potions.
Brewing Stand Basics
To brew, you need:
- Brewing Stand
- Blaze Powder (fuel for the stand)
- Water Bottles (base for all potions)
- Ingredients (Nether Wart, Ghast Tear, etc.)
The Brewing Stand is the main tool for potion-making. You place it in your base or a special brewing room. Once you have your stand, you need Blaze Powder. Without Blaze Powder, the stand won’t work. Each piece of Blaze Powder lasts for about 20 brews, so bring extra if you plan to make many potions.
Fill the stand with Blaze Powder, place water bottles in the slots, and add ingredients step-by-step. You can brew up to three bottles at once, which is much faster than doing one at a time.
Water Bottles are easy to make. Craft glass bottles, fill them with water from any source block, and they’re ready. Always keep extra bottles, because you need one for each potion.
Brewing Steps
- Prepare water bottles: Fill glass bottles with water. You can fill them from lakes, rivers, or cauldrons.
- Add Nether Wart: Makes the base Awkward Potion (needed for most recipes). This step is essential—almost all potions start with an Awkward Potion.
- Add main ingredient: This defines the potion’s effect (e.g., Sugar for Swiftness). The main ingredient gives the potion its power.
- Optional modifiers: Add Redstone or Glowstone Dust to change duration or strength. Modifiers are used after the main effect is set.
- Make splash or lingering: Add Gunpowder (for splash) or Dragon’s Breath (for lingering). These steps turn regular potions into special types.
Each potion takes 20 seconds to brew. You must repeat the steps for every bottle. If you want three potions at once, place three bottles in the stand.
A hidden tip: You can use hoppers to automatically load bottles and ingredients, making brewing much easier, especially for large batches.
Brewing Stand Vs. Cauldron
You might see Cauldrons in the game, but they don’t brew potions. Cauldrons can hold water or lava and can be used to dye armour or store water for filling bottles. Only the Brewing Stand is used for potion-making.
Some beginners try to brew potions in cauldrons and get confused. Remember: Cauldrons are for storage and dyeing, not brewing.
Key Ingredients And Where To Find Them
Potions need special items as ingredients. Some are easy to find; others are rare. Here’s a look at the most important ones:
- Nether Wart: Found in Nether Fortresses. Essential for almost every potion.
- Blaze Powder: Made from Blaze Rods (dropped by Blazes in the Nether). Used as fuel.
- Ghast Tear: Dropped by Ghasts in the Nether. Needed for Regeneration.
- Magma Cream: Made from Magma Cubes or by combining slime and blaze powder. Used for Fire Resistance.
- Sugar: Crafted from sugar cane (found near water). Used for Swiftness.
- Rabbit’s Foot: Dropped by rabbits. Needed for Leaping Potions.
- Golden Carrot: Crafted from carrots and gold nuggets. Used for Night Vision.
- Spider Eye: Dropped by spiders. Used for Poison and Weakness.
- Fermented Spider Eye: Made with spider eye, sugar, and brown mushroom. Used for negative potions.
- Glistering Melon: Crafted from melon and gold nuggets. Used for Healing.
- Redstone: Mined underground. Extends duration.
- Glowstone Dust: Mined in the Nether. Increases strength.
- Gunpowder: Dropped by creepers. Needed for splash potions.
- Dragon’s Breath: Collected in The End during the Ender Dragon fight. Used for lingering potions.
Some ingredients are rare or dangerous to get. For example, Rabbit’s Foot has a low drop rate, and Ghast Tears require fighting flying Ghasts.
Let’s explain where to find each ingredient and some tips for collecting them:
- Nether Wart: Look for Nether Wart farms inside Nether Fortresses. They grow on Soul Sand. Harvest them and replant for a steady supply.
- Blaze Powder: Fight Blazes in the Nether. Blazes are dangerous, so bring Fire Resistance potions or good armour. Each Blaze Rod gives two Blaze Powders.
- Ghast Tear: Ghasts are big, floating mobs that shoot fireballs. They drop Ghast Tears when killed. Use a bow to defeat them easily. Ghast Tears are rare, so collect them whenever possible.
- Magma Cream: Magma Cubes spawn in the Nether. Kill them, and they drop Magma Cream. You can also craft Magma Cream by combining Blaze Powder and Slime Balls.
- Sugar: Find sugar cane near water, break it, and craft sugar. Sugar cane grows quickly, so make a farm for easy access.
- Rabbit’s Foot: Rabbits spawn in plains, forests, and deserts. Not all rabbits drop a foot, so hunt carefully. Breeding rabbits can help get more.
- Golden Carrot: Craft using a regular carrot surrounded by eight gold nuggets. Carrots grow on farmland; gold is mined underground.
- Spider Eye: Kill spiders at night or in caves. Spider Eyes are common drops.
- Fermented Spider Eye: Combine Spider Eye, Sugar, and Brown Mushroom. Brown Mushrooms grow in forests, caves, and the Nether.
- Glistering Melon: Craft using a melon slice surrounded by eight gold nuggets. Melons grow on farmland or can be found in jungle biomes.
- Redstone: Mine underground, usually between levels 1 and 16. Redstone is common, but you need an iron or better pickaxe.
- Glowstone Dust: Find glowstone blocks in the Nether. Break them to get Glowstone Dust. Be careful not to fall while mining.
- Gunpowder: Kill creepers, witches, or ghosts. Gunpowder is a common drop and useful for TNT too.
- Dragon’s Breath: When fighting the Ender Dragon, collect the purple mist it breathes using an empty bottle. Dragon’s Breath is only available during the dragon fight.
A practical tip: Make a chest for each ingredient in your brewing room. This keeps everything organized and makes brewing much faster.
Another insight: Some ingredients, like Nether Wart and Magma Cream, can be farmed or crafted, but others (Ghast Tear, Rabbit’s Foot) are only dropped by mobs. Plan your hunting trips to collect rare items.
Types Of Potions And Their Effects
Potions are divided into positive (helpful) and negative (harmful) effects. Here’s a breakdown of the main types and what they do.
Positive Potions
- Healing: Instantly restores health.
- Regeneration: Slowly restores health over time.
- Swiftness: Increases movement speed.
- Fire Resistance: Protects from fire and lava.
- Night Vision: Lets you see in darkness or underwater.
- Strength: Boosts attack power.
- Leaping: Lets you jump higher.
- Water Breathing: Lets you breathe underwater.
- Invisibility: Makes you invisible to mobs and players.
Positive potions help you survive, fight stronger mobs, explore new areas, and avoid dangers. For example, Fire Resistance is a must-have in the Nether, where lava is everywhere.
Healing is instant, so it’s great for emergencies. Regeneration is slower but lasts longer. Swiftness makes travel faster; combine it with Jump Boost for even more mobility.
Night Vision is useful for exploring dark caves, underwater ruins, or at night. Strength gives more attack power, making boss fights easier.
Leaping is less used but can be fun for jumping over obstacles. Water Breathing allows long dives in oceans.
Invisibility is useful for sneaking past mobs, escaping PvP, or exploring without being noticed. But be careful—armour and held items are still visible.
Negative Potions
- Poison: Damages over time but doesn’t kill.
- Weakness: Reduces attack power.
- Slowness: Decreases movement speed.
- Harming: Instantly deals damage.
- Blindness: Makes the screen dark (Java Edition only).
- Decay: Causes Wither effect (Bedrock Edition).
Negative potions are used in combat to weaken enemies or in traps. Splash or lingering versions are best for harming groups.
Poison damages over time but won’t kill. It’s good for softening up mobs before finishing them off. Weakness lowers attack power, making enemies less dangerous.
Slowness is useful for slowing enemy players in PvP or mobs in defence. Harming does instant damage, which is great for quick attacks.
Blindness and Decay are rare but powerful. Decay gives the Wither effect, which damages over time and is harder to cure.
Comparison Table Of Potion Effects
Here’s a quick comparison of positive and negative potions:
| Potion | Effect | Duration | Strength |
|---|---|---|---|
| Healing | Instant Health | Instant | Level I/II |
| Regeneration | Health over time | 45 sec / 22 sec | Level I/II |
| Swiftness | Speed | 3 min / 8 min | Level I/II |
| Fire Resistance | Immunity to fire/lava | 3 min / 8 min | N/A |
| Poison | Damage over time | 45 sec / 22 sec | Level I/II |
| Weakness | Lower attack | 1.5 min / 4 min | N/A |
Different potions have different durations and strengths. Some can be upgraded with Glowstone Dust (for stronger effects) or Redstone (for longer duration).
A practical point: not every potion can be both extended and strengthened. For example, Healing can only be made stronger, not longer.
Credit: minecraft-legacy-console-edition.fandom.com
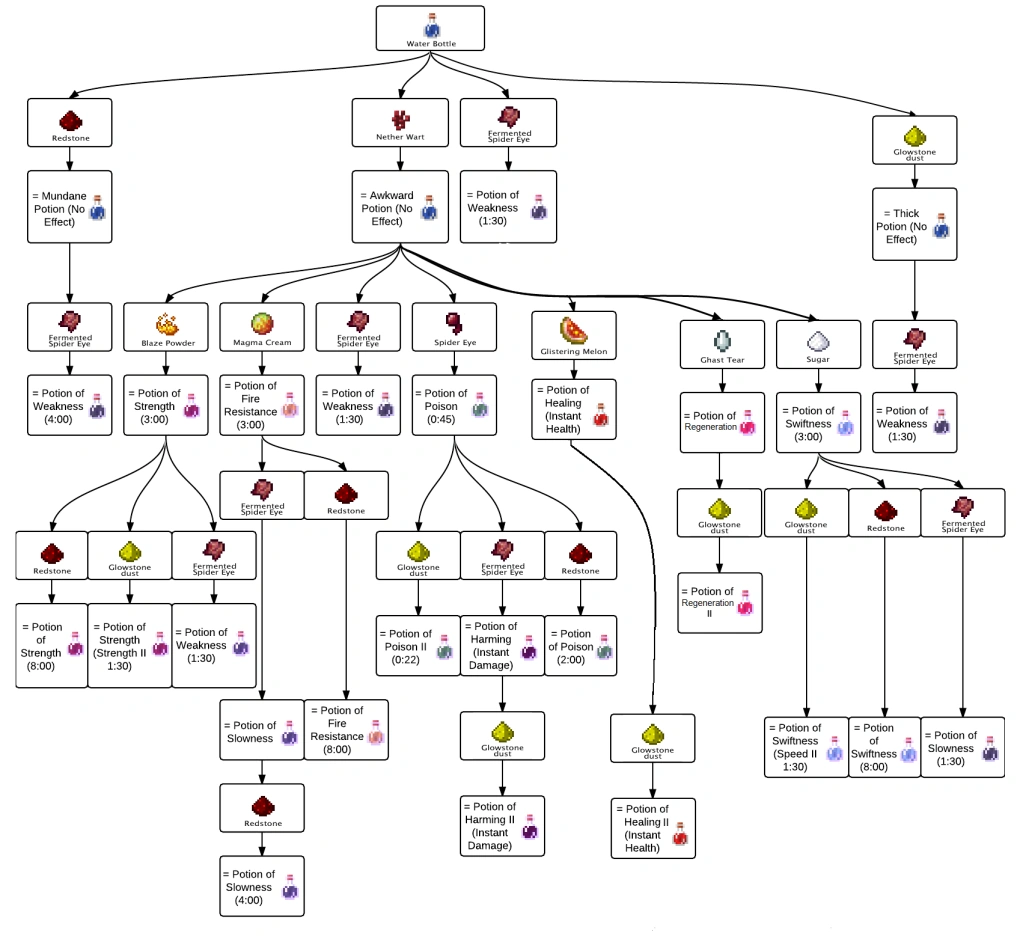
How To Brew Every Potion: Recipes And Steps
Let’s look at the brewing recipes for the most popular Minecraft potions. Each recipe follows a basic pattern but has unique ingredients.
Basic Brewing Steps
- Fill glass bottles with water.
- Place bottles in the Brewing Stand.
- Add Nether Wart to make Awkward Potion.
- Add the main ingredient for the desired effect.
- Optional: Add modifiers (Redstone or Glowstone Dust).
- Optional: Add Gunpowder for splash, Dragon’s Breath for lingering.
Every potion starts with a water bottle. Add Nether Wart to make an Awkward Potion (except Weakness, which uses a water bottle directly).
Modifiers (Redstone, Glowstone Dust) are added after the main effect. Always follow the proper order: base, main ingredient, then modifier.
Potion Recipes
Healing Potion
- Main ingredient: Glistering Melon
- Effect: Restores health instantly
- Modifiers: Glowstone Dust for Healing II
Regeneration Potion
- Main ingredient: Ghast Tear
- Effect: Regenerates health over time
- Modifiers: Redstone for longer, Glowstone Dust for Regeneration II
Swiftness Potion
- Main ingredient: Sugar
- Effect: Increased speed
- Modifiers: Redstone for longer, Glowstone Dust for Swiftness II
Fire Resistance Potion
- Main ingredient: Magma Cream
- Effect: Protection from fire/lava
- Modifiers: Redstone for longer
Night Vision Potion
- Main ingredient: Golden Carrot
- Effect: See in the dark
- Modifiers: Redstone for longer
Strength Potion
- Main ingredient: Blaze Powder
- Effect: Increased attack power
- Modifiers: Redstone for longer, Glowstone Dust for Strength II
Leaping Potion
- Main ingredient: Rabbit’s Foot
- Effect: Jump higher
- Modifiers: Redstone for longer, Glowstone Dust for Leaping II
Water Breathing Potion
- Main ingredient: Pufferfish
- Effect: Breathe underwater
- Modifiers: Redstone for longer
Invisibility Potion
- Main ingredient: Fermented Spider Eye (added to Night Vision)
- Effect: Invisible to mobs/players
- Modifiers: Redstone for longer
Poison Potion
- Main ingredient: Spider Eye
- Effect: Damages over time
- Modifiers: Redstone for longer, Glowstone Dust for Poison II
Weakness Potion
- Main ingredient: Fermented Spider Eye (added to Water Bottle)
- Effect: Reduces attack power
- Modifiers: Redstone for longer
Slowness Potion
- Main ingredient: Fermented Spider Eye (added to Swiftness or Leaping Potion)
- Effect: Slows movement
- Modifiers: Redstone for longer, Glowstone Dust for Slowness II
Harming Potion
- Main ingredient: Fermented Spider Eye (added to Healing or Poison Potion)
- Effect: Instantly damages
- Modifiers: Glowstone Dust for Harming II
Advanced Recipes
Some potions need more than one ingredient or step. For example, Invisibility requires a Night Vision potion plus a Fermented Spider Eye.
Another example: Potion of Harming can be made from a Healing or Poison potion by adding a Fermented Spider Eye. This is not obvious to beginners.
A practical tip: Always check the recipe before brewing, especially if you’re making a complex potion.
Lingering Potions
To make a lingering potion:
- Brew a splash potion.
- Add Dragon’s Breath to the Brewing Stand.
Lingering potions are used for area effects, especially in multiplayer or boss fights. They are rare because Dragon’s Breath is hard to collect.
A hidden insight: Lingering potions can be used in traps or to heal groups in multiplayer. They are not just for attacking—Lingering Healing can keep your team alive during tough battles.
Modifiers: Redstone, Glowstone Dust, Gunpowder, And Dragon’s Breath
Modifiers change how potions work. Understanding them is key to making the best potions.
- Redstone: Increases duration (longer effects).
- Glowstone Dust: Increases potency (stronger effects).
- Gunpowder: Converts drinkable potions to splash (throwable).
- Dragon’s Breath: Converts splash potions to lingering (creates area effects).
Not every potion can be modified in both ways. For example, Healing can be made stronger, but not longer.
Some potions, like Fire Resistance, can only be extended with Redstone, not made stronger.
Modifier Comparison Table
Here’s a quick look at how modifiers affect potions:
| Modifier | Effect | Potions Affected |
|---|---|---|
| Redstone | Longer duration | Regeneration, Swiftness, Fire Resistance, etc. |
| Glowstone Dust | Stronger effect | Healing, Poison, Strength, etc. |
| Gunpowder | Turns drinkable to splash | Most potions |
| Dragon’s Breath | Turns splash into lingering | Most splash potions |
A practical tip: If you use both Redstone and Glowstone Dust, the last modifier added will decide the effect. You cannot combine both modifiers for duration and strength on the same potion.
A mistake beginners make: adding modifiers before the main effect. Always add the main ingredient first, then modifiers.
Using Potions: Combat, Exploration, And Multiplayer
Potions are not just for brewing—they’re for using wisely. Let’s explore the best ways to use potions in different game situations.
Combat
- Strength and Healing potions are essential for fighting tough mobs or bosses like the Ender Dragon or Wither.
- Regeneration keeps you alive in long battles.
- Poison and Harming are great for PvP or clearing groups of mobs.
A common mistake is forgetting to use Splash Potions in group fights. Splash Potions affect multiple targets, making them ideal for multiplayer.
Another insight: Use splash potions of Healing on yourself and allies during a fight. Throwing a splash potion at your feet heals you instantly.
Lingering potions are powerful in boss fights. Place a Lingering Healing or Strength potion where your team gathers. Everyone who enters the cloud gets the effect.
Invisibility can be used to sneak up on enemies or escape when low on health. But remember, held items and armour are visible.
Exploration
- Night Vision helps in caves and underwater.
- Fire Resistance is critical in the Nether, especially near lava.
- Water Breathing lets you explore oceans and ruins.
Beginners often forget to bring Fire Resistance when visiting the Nether, leading to accidental deaths in lava.
A practical tip: Bring Swiftness and Night Vision for cave exploration. You can move faster and see better, avoiding hidden dangers.
Another non-obvious insight: Use Water Breathing and Night Vision together for underwater adventures. You can see and breathe, making ocean monuments much easier.
Multiplayer
- Invisibility can be used for sneaking or escaping.
- Lingering Potions create area effects, which are useful in team fights.
- Weakness and Slowness can turn the tide in PvP battles.
A non-obvious tip: Use Lingering Healing in team fights to keep your group alive.
Another practical tip: In PvP, splash potions of Poison or Harming can weaken enemies quickly. Throw them at enemy groups for maximum effect.
A hidden strategy: Use splash potions of Weakness on hostile mobs, like zombies, to make them easier to fight. Then cure zombie villagers with Weakness and a Golden Apple.
Brewing Tips And Common Mistakes
Brewing looks simple, but there are tricks and pitfalls. Here are practical tips and mistakes to avoid.
Tips
- Always stockpile Nether Wart and Blaze Powder. They run out fast.
- Create a dedicated brewing room with chests for ingredients.
- Use Redstone and Glowstone Dust wisely—don’t waste them on potions that can’t be modified.
- Plan: Brew potions before you go exploring, not during emergencies.
A practical tip: Place item frames above chests to label ingredients. This makes brewing faster and prevents mistakes.
Another advanced tip: Use hoppers and Redstone to automate brewing. You can brew large batches for big events or multiplayer battles.
Common Mistakes
- Brewing without enough Blaze Powder (stand won’t work).
- Forgetting to make Awkward Potion base (most potions need it).
- Adding modifiers in the wrong order—Redstone or Glowstone must go after the main ingredient.
- Trying to brew with a Cauldron instead of a Brewing Stand.
A mistake beginners make: Dragon’s Breath can only be collected during the Ender Dragon fight. Don’t waste it; lingering potions are rare and valuable.
Another common error: brewing only one potion at a time. Always brew three bottles together for efficiency.
A practical point: Don’t use Redstone or Glowstone Dust on potions that can’t be modified. For example, Fire Resistance can only be extended, not made stronger.
Advanced Potion Strategies
As you get better at Minecraft, you can use potions in more creative ways.
Potion Stacking
You can drink or splash multiple potions for combined effects. For example, Swiftness and Strength make you faster and stronger in combat.
A practical tip: Stack Regeneration, Strength, and Fire Resistance before a boss fight. You’ll survive longer and deal more damage.
Another advanced strategy: Combine Invisibility with Swiftness for sneaky movement in PvP.
Potion Traps
Splash or lingering potions can be used in traps. Place a lingering potion of Poison or Slowness near your base to deter enemies.
A hidden tip: Use dispensers and Redstone to throw splash potions automatically when enemies enter your base.
Potion Trading
Villagers sometimes offer potion-related trades. Brewing extra potions can help you get rare items.
A practical tip: Trade with Clerics for Redstone, Glowstone Dust, and Bottle o’ Enchanting. This saves time and resources.
Potion Brewing Automation
Redstone experts can automate brewing with hoppers and dispensers. This saves time and lets you brew in bulk.
A non-obvious insight: Automated brewing is great for multiplayer servers. You can supply your team with potions for big events.
Rare And Unusual Potions
Some potions are less common or only available in certain versions.
- Potion of Decay: Only in Bedrock Edition. Causes the withering effect.
- Potion of Blindness: Java Edition only (creative mode).
- Potion of Luck: Not normally craftable; used in events or creative mode.
These potions are not used in survival gameplay but can be found in certain maps or challenges.
A practical tip: Potion of Luck increases loot drops. If you find it in an adventure map, use it before opening chests or killing mobs.
How Potions Work In Minecraft Versions
Minecraft has two main versions: Java Edition and Bedrock Edition. Potions work almost the same, but there are differences.
- Potion of Decay exists only in Bedrock.
- Potion of Blindness is exclusive to Java Edition (Creative).
- Brewing steps and ingredient locations may differ slightly.
Always check your game version before following recipes.
A practical insight: If you play on Bedrock, look for Potion of Decay for PvP. If you play Java, Blindness can be used in creative mode for custom maps.
Potions And Enchantments: How They Interact
Potions and enchantments can be combined for stronger effects. For example, Protection armour plus Fire Resistance potion makes you almost immune to fire.
A non-obvious insight: Potion effects do not stack with similar enchantments. For example, Speed Potion and Depth Strider boots don’t make you faster in water beyond a certain limit.
Another tip: Use potions and enchantments together for balanced defence and offence. For example, combine a Regeneration potion with armour enchanted with Protection for longer survival.
Potion Effects: Data And Statistics
Potion effects are coded in the game with unique IDs and properties. Here’s a look at potion data:
- Duration: Most potions last 3 minutes (can be extended to 8).
- Strength: Some potions have two levels (e.g., Strength I and II).
- Area: Splash potions affect a radius of about 4 blocks; lingering potions create a cloud lasting 30 seconds.
A practical tip: Lingering potions are best used in small rooms or tight spaces. The cloud disappears faster in open areas.
Potion Duration Comparison Table
| Potion | Standard Duration | Extended Duration | Instant Effect |
|---|---|---|---|
| Swiftness | 3 min | 8 min | No |
| Regeneration | 45 sec | 2 min | No |
| Healing | N/A | N/A | Yes |
| Fire Resistance | 3 min | 8 min | No |
| Harming | N/A | N/A | Yes |
A practical insight: Always extend potions like Fire Resistance and Water Breathing with Redstone. You don’t want effects to run out during exploration.
Brewing Stand Automation And Redstone
Advanced players can automate potion brewing using Redstone and hoppers. This lets you brew multiple potions without manual steps.
- Place hoppers to feed bottles and ingredients into the Brewing Stand.
- Use Redstone clocks to time ingredient addition.
- Dispensers can throw splash potions automatically.
Automating brewing is efficient for multiplayer servers or large bases.
A practical tip: Set up a brewing station with hoppers feeding bottles, ingredients, and Blaze Powder. You can brew 3 potions at once, refill automatically, and collect finished potions in a chest.
Another advanced insight: Use dispensers and Redstone to defend your base with splash potions of Poison or Slowness.
Potions In Minecraft Challenges And Minigames
Potions are often used in Minecraft events, speedruns, and minigames.
- Speedruns: Swiftness and Fire Resistance are key for quick Nether travel.
- PvP minigames: Splash potions of Poison, Harming, and Strength are common.
- Adventure maps: Potions are used for puzzles, traps, and story elements.
A practical tip: In adventure maps, keep a mix of potions for unexpected challenges.
Another insight: Use Invisibility and Night Vision for puzzle maps where mobs or traps are hidden.
Potion Storage And Management
Managing potions is important for survival. Potions take up inventory space and can be confusing.
- Use labelled chests for each potion type.
- Carry potions in your hotbar for quick access.
- Store modifiers (Redstone, Glowstone, Gunpowder) separately.
A common mistake: forgetting to carry splash potions for emergencies. Always keep a Healing Splash Potion handy.
A practical tip: Use shulker boxes to store potions. Shulker boxes let you carry many potions in one inventory slot.
Another insight: Use item frames to display potion types above chests. This saves time when searching for the right potion.
Brewing Room Design Ideas
Creating a brewing room can make potion-making easier. Here are some design ideas:
- Place Brewing Stands on a central table.
- Add item frames to show potion types.
- Use chests for ingredient storage.
- Set up Redstone automation for advanced brewing.
A well-designed brewing room saves time and reduces mistakes.
A practical tip: Place water sources in your brewing room for easy bottle filling. Use cauldrons or fountains for decoration and function.
Another insight: Design your room with space for hoppers, chests, and dispensers. You can automate brewing and potion delivery.
Potions And Villager Trading
Some villagers, like Clerics, offer trades for potion ingredients or bottles. You can trade:
- Glowstone Dust
- Redstone
- Bottle o’ Enchanting
Trading can help you get rare ingredients without fighting mobs.
A practical tip: Level up Clerics by trading rotten flesh, then trade for potion ingredients.
Another insight: Use villagers to get Redstone and Glowstone Dust when you don’t want to mine or fight in the Nether.

Credit: minecraft.fandom.com
Potions In Minecraft Updates
Minecraft updates sometimes add new potions or change recipes. For example:
- Potion of Decay was added in the Bedrock Edition.
- Brewing times and ingredient drop rates can change.
- New ingredients may be added in future updates.
To keep up with changes, check the official Minecraft wiki or news pages like Minecraft Wiki.
A practical tip: Always check update notes before brewing new potions. Recipes and effects can change.
Potion Effects On Mobs
Potions can affect mobs as well as players. Some mobs react differently:
- Zombies: Can be cured with Weakness and a Golden Apple.
- Villagers: Splash potions can heal or harm groups.
- Witches: Use potions themselves; immune to some effects.
A non-obvious tip: Splash potions can be used to heal tamed animals, like wolves.
Another insight: Use splash potions of Weakness to cure zombie villagers and get rare trades.
A practical tip: Don’t use Poison or Harming on witches—they are immune and may heal themselves.

Credit: www.reddit.com
Brewing Stand Fuel: Blaze Powder
The Brewing Stand needs Blaze Powder for fuel. Without it, you can’t brew. Each Blaze Powder lasts for 20 brewing operations.
- Always keep extra Blaze Powder in your brewing room.
- Blaze Powder is made from Blaze Rods, found in the Nether.
A beginner’s mistake: forgetting fuel and wasting valuable ingredients.
A practical tip: Farm Blazes in the Nether for Blaze Rods. Build a Blaze farm for easy access.
Brewing Stand Vs. Cauldron: The Differences
Many players confuse the Cauldron and the Brewing Stand. Here’s a quick comparison:
- Brewing Stand: Used for making potions. Needs Blaze Powder.
- Cauldron: Holds water, lava, or powder. Can dye armour.
You cannot brew potions in a Cauldron. Only use the Brewing Stand.
A practical tip: Use cauldrons for decoration and water storage in your brewing room.
Potion Brewing For Beginners: Step-by-step Example
Let’s walk through a simple brewing process for a Healing Potion.
- Craft glass bottles and fill them with water.
- Place bottles in the Brewing Stand.
- Add Blaze Powder for fuel.
- Add Nether Wart to make Awkward Potion.
- Add Glistering Melon for the healing effect.
- Optional: Add Glowstone Dust for Healing II.
- Remove potion bottles and store.
This process works for most potions with ingredient changes.
A practical tip: Always brew three bottles at once for efficiency.
Another insight: Use item frames to mark potion types in your brewing room.
Potion Brewing For Advanced Players
Advanced players use automation, bulk brewing, and strategic storage.
- Build automatic brewing stations with hoppers.
- Brew potions in batches before big fights.
- Use lingering potions for area control.
A non-obvious insight: Lingering potions can be combined with Redstone traps for creative defences.
Another advanced tip: Use dispensers to throw splash potions automatically in PvP arenas.
Potions And Minecraft Achievements
Brewing potions is tied to achievements like:
- Local Brewery: Brew your first potion.
- Master Brewer: Brew all potion types.
- Overkill: Use Strength potion to deal serious damage.
Achievements help guide players to explore potion mechanics.
A practical tip: Try to earn all brewing achievements for full mastery.
Minecraft Potions In Education
Potions teach logic, resource management, and planning. Some schools use Minecraft to teach science concepts, using potion recipes to explain chemistry.
A practical insight: Potion recipes show how combining ingredients creates new effects, similar to real-life experiments.
Potions In Minecraft Dungeons And Spin-offs
Other Minecraft games, like Minecraft Dungeons, use potions differently. In Dungeons, potions are rare drops or power-ups.
- Healing and Strength potions are key in Dungeons.
- Effects last for short periods, unlike regular Minecraft.
A practical tip: Use potions wisely in Dungeons—save Healing Potions for tough fights.
The Future Of Potions In Minecraft
Developers often add new potions or mechanics. Possible future options could include:
- Potion of Levitation
- Potion of Resistance
- Potion of Luck (survival use)
Players sometimes suggest new potion ideas on forums and the official site.
A practical insight: Watch updates for new potion types and recipes.
Frequently Asked Questions
What Is The Easiest Potion To Brew In Minecraft?
The Potion of Swiftness is the easiest. You only need sugar and Nether Wart. Both are easy to find early in the game.
How Do You Make A Splash Potion?
To make a splash potion, brew your desired drinkable potion, then add Gunpowder to the Brewing Stand. Splash potions can be thrown to affect a group.
Can You Brew Potions Without Blaze Powder?
No, the Brewing Stand needs Blaze Powder as fuel. Without it, brewing won’t work. Always keep Blaze Powder stocked.
What Does The Potion Of Invisibility Do?
The Potion of Invisibility makes you invisible to mobs and players. Armour and held items can still be seen, so remove them for full effect.
Are Potions Stackable In Inventory?
No, potions do not stack. Each potion takes one inventory slot. Organize your potions with labelled chests or shulker boxes for easy access.
Minecraft potions add depth, creativity, and power to your game. By mastering brewing, understanding effects, and using potions wisely, you can survive, explore, and dominate in any Minecraft world. Whether you’re a beginner or an expert, potions are one of the game’s most rewarding systems.
Start brewing, experiment, and enjoy the magic!